> For the complete documentation index, see [llms.txt](https://help.adalo.com/llms.txt). Markdown versions of documentation pages are available by appending `.md` to page URLs; this page is available as [Markdown](https://help.adalo.com/actions/notifications/scheduled-notifications/create-scheduled-notification-on-trigger.md).
# Create Scheduled Notification on Trigger
When something important happens in your app (user books, creates, purchases, etc.), automatically create and schedule a notification. This provides seamless reminders without requiring extra user act
***
### Before You Begin
* Map out the User flow to ensure data is available
* Set up a Collection to track scheduled notifications
***
#### The Three-Action Pattern
Most scheduled notifications follow the same basic pattern:
1. **Create Notification Record** – Store the notification in your Adalo Collectionn.
2. **Schedule the Notification** – Tell Adalo when to send it and at what frequency.
3. **Update newly created Notification Record to store the Job ID** – Save the notification's Job ID for future management.
***
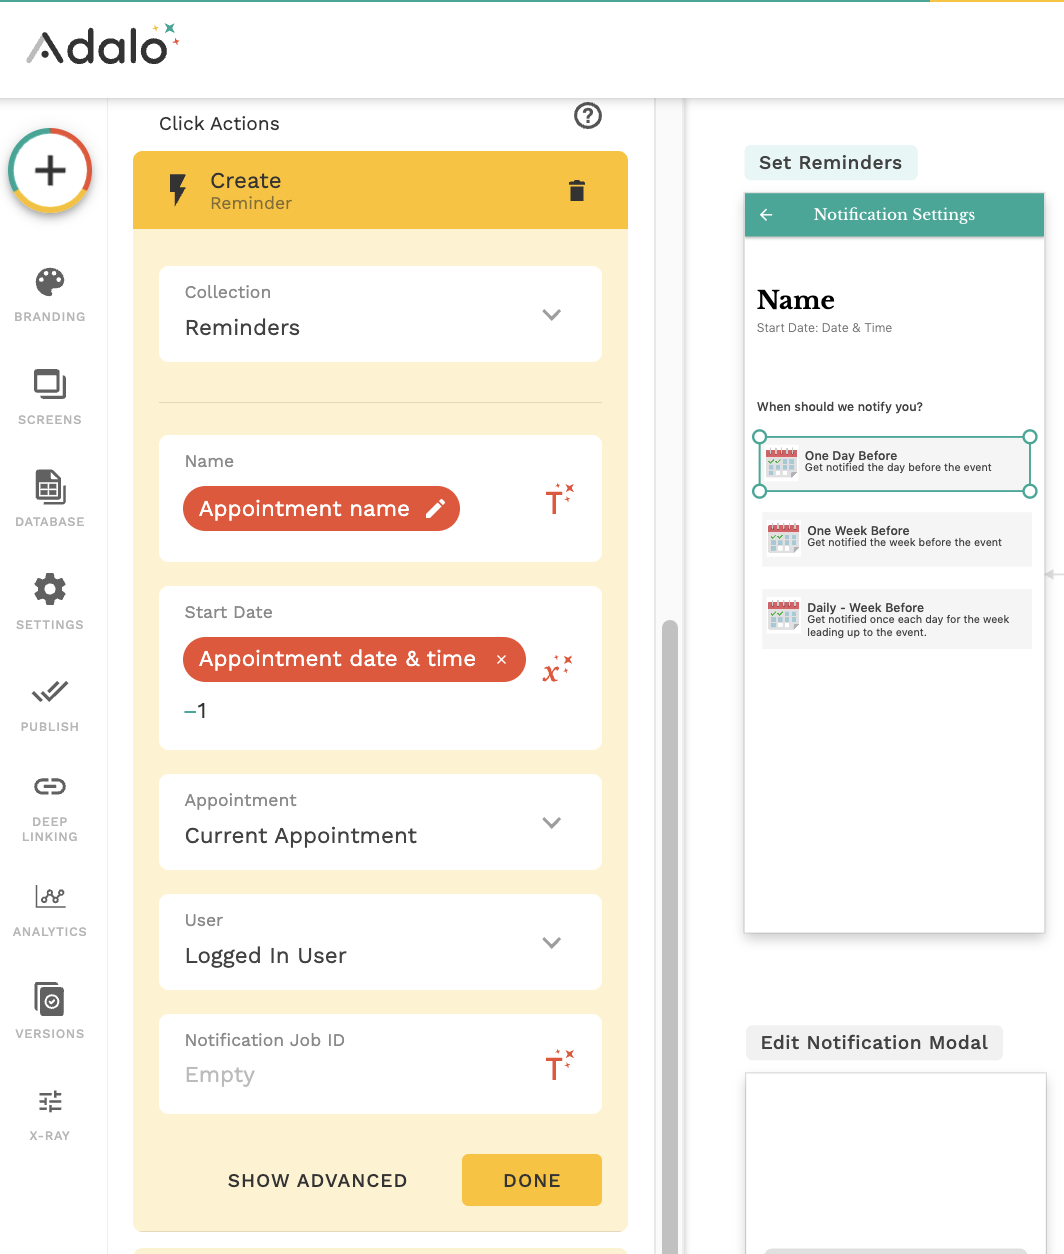
#### Create the Notification Record
Add a **Create** action that creates a new record in your Notifications collection.
**Field values:**
* **Name:** Reference the main record's name
* **Start Date:** The trigger date minus how many days/hours before you want the notification.
* Use negative numbers: `-1` = 1 day before, `-3` = 3 days before, `-7` = 1 week before
* **Related Appointment:** Link to the current record
* **User:** Who should receive it
* Or reference a related user if applicable
* **Notification Job ID:** Leave blank (you'll fill this in Step 3)
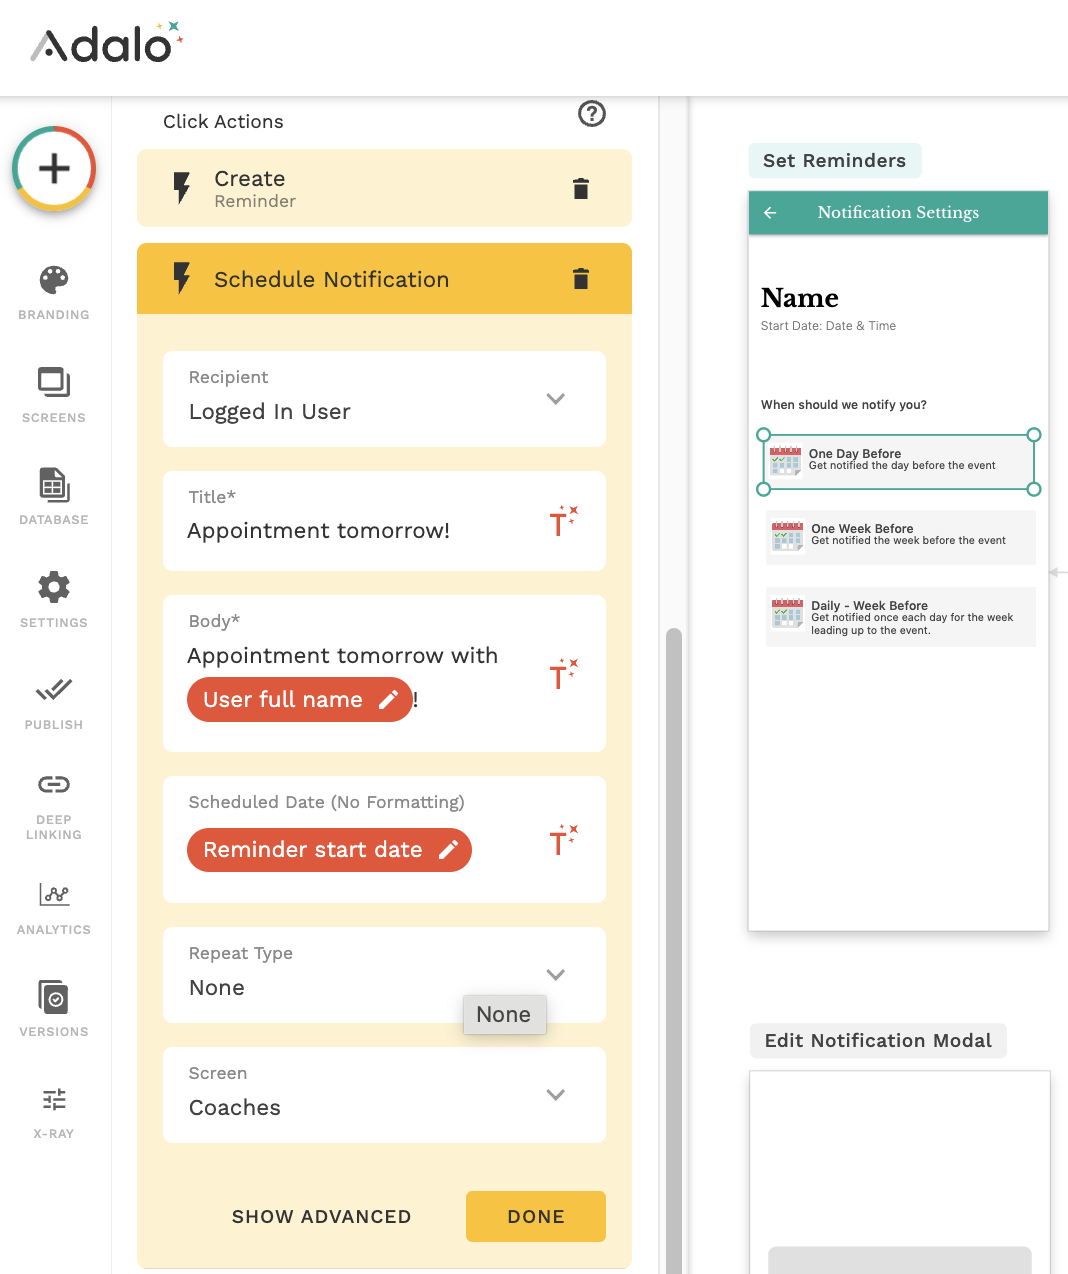
#### Schedule the Notification
Immediately after creating the record, add a **Schedule Notification** action.
#### **Notification set up:**
* **Recipient:** The user who should receive it (usually the same user from Step 1)
* **Title:** What the notification is about
* **Body:** The message the user sees
* Include relevant details: what it's about, who it involves, timing context, etc.
{% hint style="danger" %}
**Warning:** If the body of the Notification action is left empty, **the notification will fail on Android and Web.** Always make sure the body field is filled in to ensure notifications are delivered across all platforms.
{% endhint %}
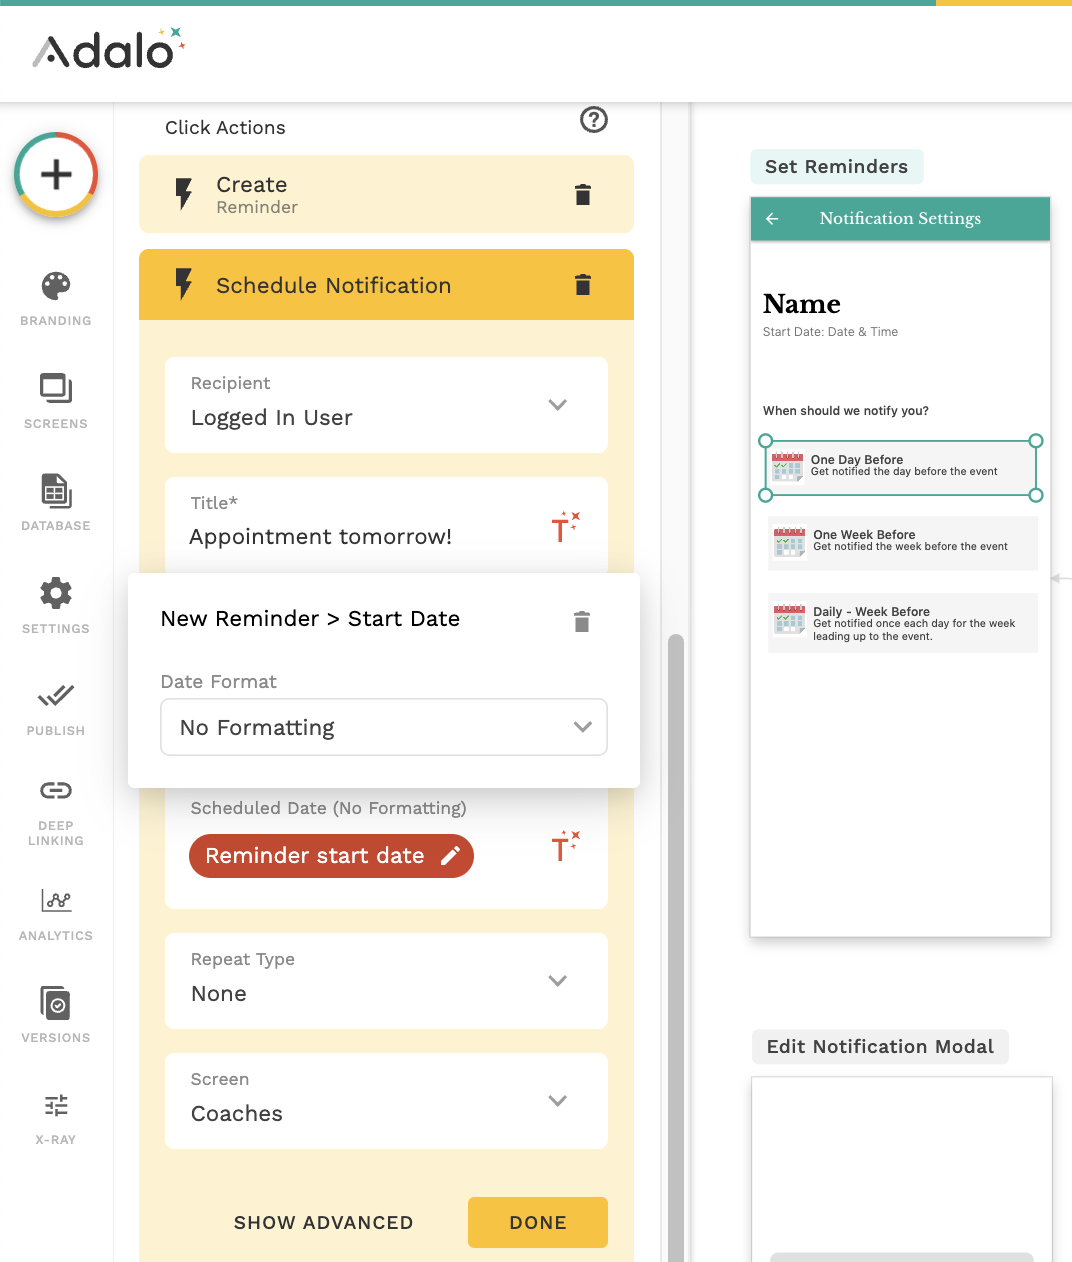
* **Scheduling Date:** Use the date from the New Record created in Step 1
{% hint style="warning" %}
**Date Format:** ⚠️ **CRITICAL** You must change the date format:
1. Click the date format field (defaults to "relative")
2. Scroll to the bottom of the dropdown
3. Select **"No Formatting"**
This converts to the Unix timestamp Adalo requires.
{% endhint %}
* **Repeat Type: *****None*** if only sending 1 notification
* **Target Screen:** Link to a relevant screen in your app.
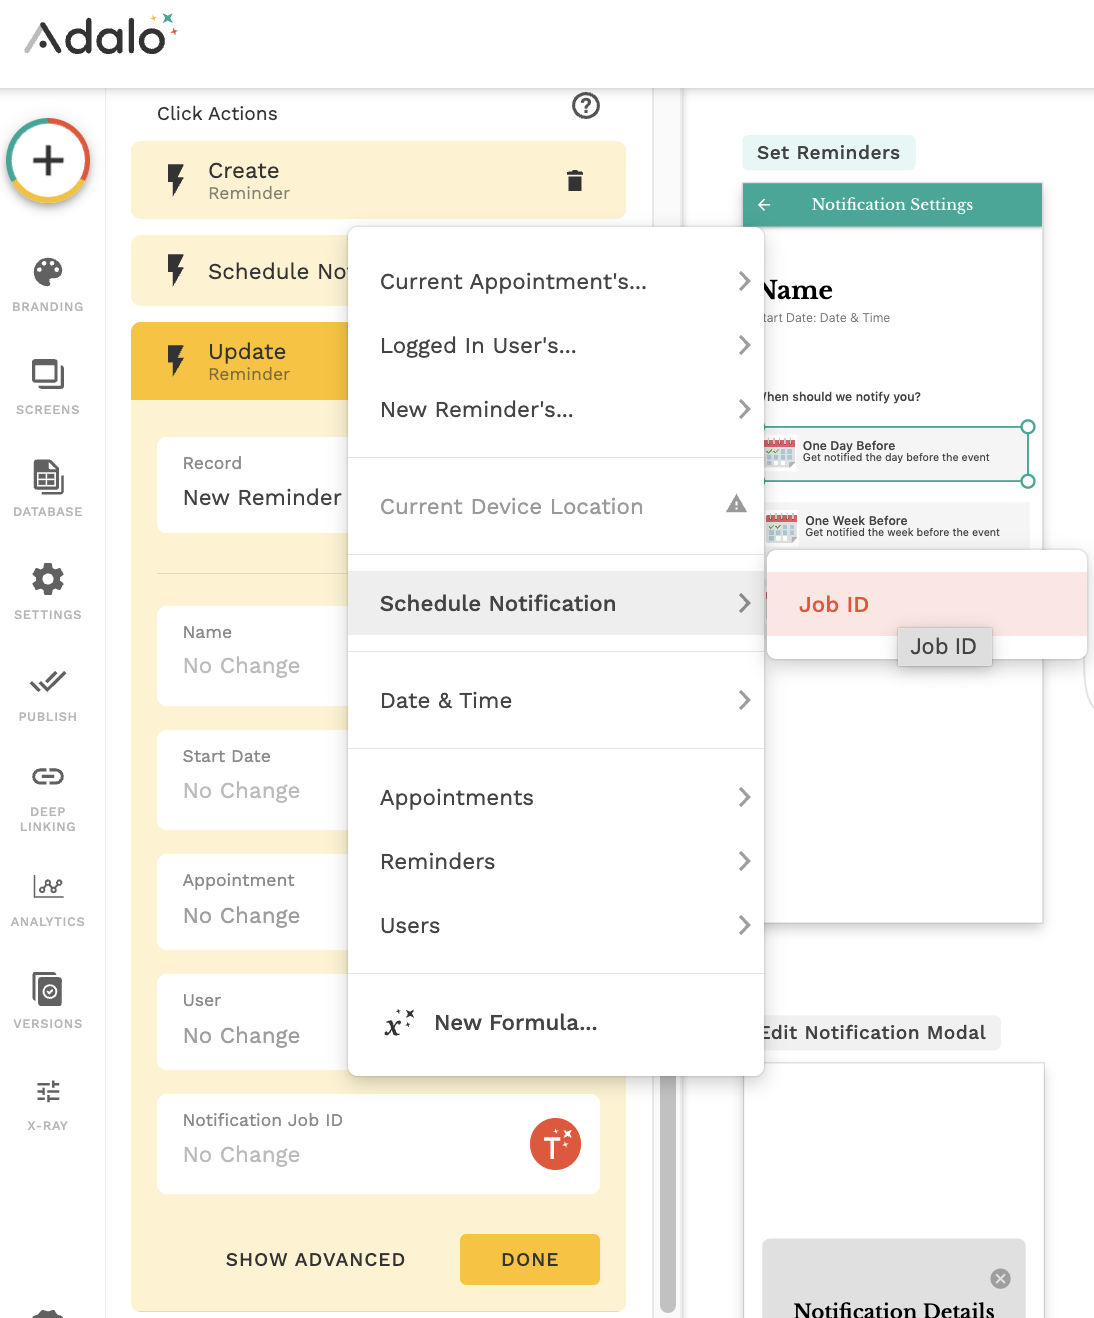
#### Update Notification Record to Store the Job ID
Add an **Update** action immediately after scheduling.
Update the notification record you just created:
**Why this matters:** The Job ID is Adalo's unique identifier for this scheduled notification. You need it later to cancel or modify the notification. It's only available right after scheduling, so capture it now.
#### Complete Action Sequence
Your trigger button/action should execute in this order:
1. **Original actions** (create appointment, mark as booked, etc.)
2. **Create Notification Record** ← New
3. **Schedule Notification** ← New
4. **Update Notification Record with Job ID** ← New
5. **Additional actions** (Link, etc..)
---
# Agent Instructions
This documentation is published with GitBook. GitBook is the documentation platform designed so that both humans and AI agents can read, navigate, and reason over technical content effectively. Learn more at gitbook.com.
## Querying This Documentation
If you need additional information that is not directly available in this page, you can query the documentation by asking a question.
Perform an HTTP GET request on the following URL with the `ask` and `goal` query parameters:
```
GET https://help.adalo.com/actions/notifications/scheduled-notifications/create-scheduled-notification-on-trigger.md?ask=&goal=
```
`ask` is the immediate question: it should be specific, self-contained, and written in natural language.
`goal` is what the user is ultimately trying to achieve, the reason they need the answer. Sharing it helps GitBook give you a better, more relevant answer. A goal is most helpful when it describes the outcome the user wants rather than restating the question. For example, with `ask=how do I create an API token`, a goal like `automate deployments from our CI pipeline` lets GitBook tailor the answer to that use case.
The response will contain a direct answer to the question and relevant excerpts and sources from the documentation.
Use this mechanism when the answer is not explicitly present in the current page, you need clarification or additional context, or you want to retrieve related documentation sections.